WPF Basic
MainWindow.xaml
<Window x:Class="_025_WPFBasic.MainWindow"
        xmlns="http://schemas.microsoft.com/winfx/2006/xaml/presentation"
        xmlns:d="http://schemas.microsoft.com/expression/blend/2008"
        xmlns:x="http://schemas.microsoft.com/winfx/2006/xaml"
        xmlns:mc="http://schemas.openxmlformats.org/markup-compatibility/2006"
        mc:Ignorable="d"
        Title="Hello World" Height="500" Width="800">
    <Grid x:Name="grid1"
        Background="Orange">
        <TextBlock x:Name="txt"
            HorizontalAlignment="Center"
            VerticalAlignment="Center"
            FontSize="60"
            MouseDown="TextBlock_MouseDown">
            Hello World!
        </TextBlock>
    </Grid>
</Window>
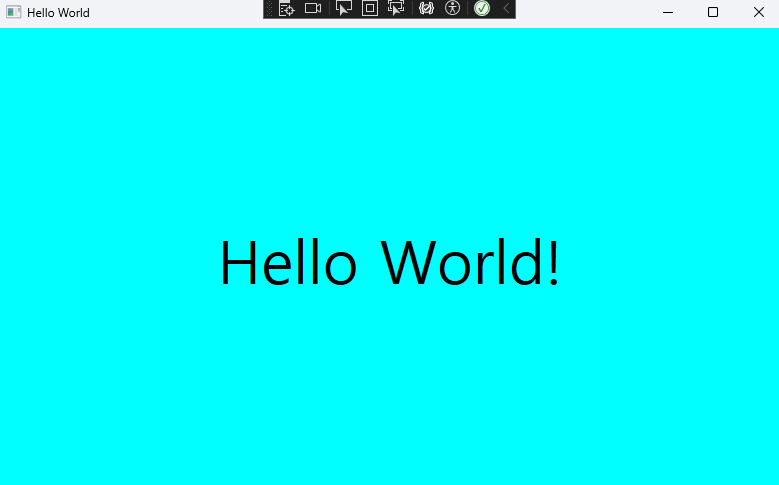
상단표시줄에 Hello World 라고 뜨고 높이는 500, 폭은 800로 수정
Grid 명은 gird1
배경은 오렌지 색
TextBlock
이름 정의는 grid1
글자 수직정렬 수평 정렬 가운데로
글자 사이즈는 60
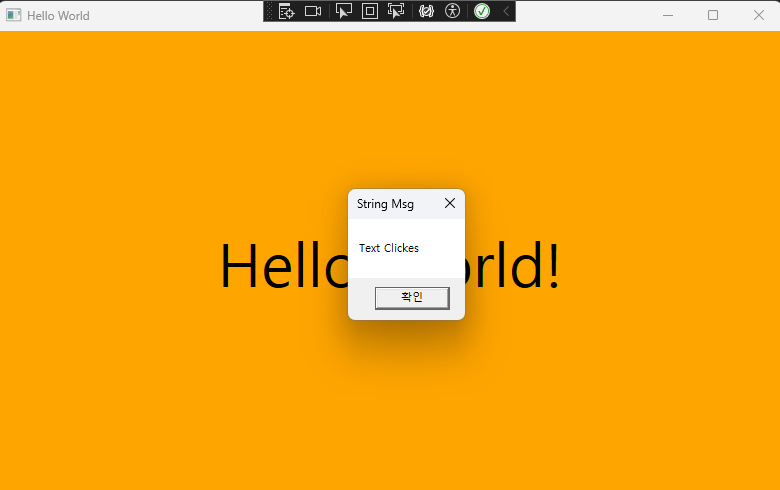
MouseDown(마우스 클릭 이벤트)는 TextBlock_MouseDown으로 설정
TextBlock 내 내용은 Hello World!
using System.Windows;
using System.Windows.Input;
using System.Windows.Media;

namespace _025_WPFBasic{
    public partial class MainWindow : Window{
        public MainWindow(){
            InitializeComponent();
        }
        private void TextBlock_MouseDown(object sender, MouseButtonEventArgs e){
            MessageBox.Show("Text Clickes","String Msg");
            if(grid1.Background == Brushes.Orange){
                grid1.Background = Brushes.Aqua;
            }
            else{
                grid1.Background = Brushes.Orange;
            }
        }
    }
}
MouseDown(마우스 클릭 이벤트)
메세지박스 설정
만약 배경색이 오렌지색이면 아쿠아 색으로 변경
아니라면 오렌지 색으로 변경

Grid
<Window x:Class="_026_Grid.MainWindow"
        xmlns="http://schemas.microsoft.com/winfx/2006/xaml/presentation"
        xmlns:x="http://schemas.microsoft.com/winfx/2006/xaml"
        xmlns:d="http://schemas.microsoft.com/expression/blend/2008"
        xmlns:mc="http://schemas.openxmlformats.org/markup-compatibility/2006"
        xmlns:local="clr-namespace:_026_Grid"
        mc:Ignorable="d"
        Title="Grid" Height="400" Width="400">
    <Grid>
        <Grid.RowDefinitions>
            <RowDefinition/>
            <RowDefinition/>
            <RowDefinition/>
        </Grid.RowDefinitions>
        <Button
            Margin="20 20 20 10"
            Grid.Row="0"
            FontSize="30">
            1
        </Button>
        <Button
            Margin="20 10"
            Grid.Row="1"
            FontSize="30">
            2
        </Button>
        <Button
            Margin="20 10 20 20 "
            Grid.Row="2"
            FontSize="30">
            3
        </Button>
    </Grid>
</Window>
그리드
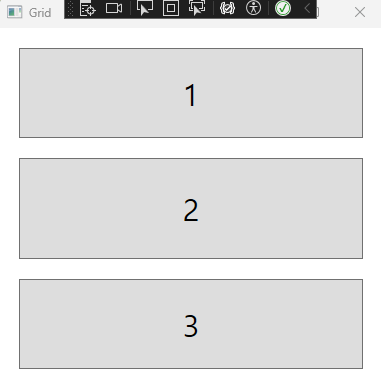
줄을 세개로 설정
첫버튼은
Grid.Row(그리드 줄) 에 0로 설정
Margin 20(좌) 20(상) 20(우) 10(하)
첫버튼은
Grid.Row(그리드 줄) 에 0로 설정
Margin 20(좌) 20(상) 20(우) 10(하)
두번째 버튼은
Grid.Row(그리드 줄) 에 1로 설정
Margin 20(옆)10(상하)
세번째 버튼은
Grid.Row(그리드 줄) 에 2로 설정
Margin 20(좌) 10(상) 20(우) 20(하)
StackPanel
<Window x:Class="_027_StackPanel.MainWindow"
        xmlns="http://schemas.microsoft.com/winfx/2006/xaml/presentation"
        xmlns:x="http://schemas.microsoft.com/winfx/2006/xaml"
        xmlns:d="http://schemas.microsoft.com/expression/blend/2008"
        xmlns:mc="http://schemas.openxmlformats.org/markup-compatibility/2006"
        xmlns:local="clr-namespace:_027_StackPanel"
        mc:Ignorable="d"
        Title="MainWindow" Height="450" Width="800">
    <StackPanel
        Orientation="Horizontal">
        <Button
            Margin="10"
            Padding="20">
            Button1
        </Button>
        <Button
            Margin="0 10"
            Padding="20">
            Button2
        </Button>
        <Button
            Margin="10"
            Padding="20">
            Button3
        </Button>
    </StackPanel>
</Window>
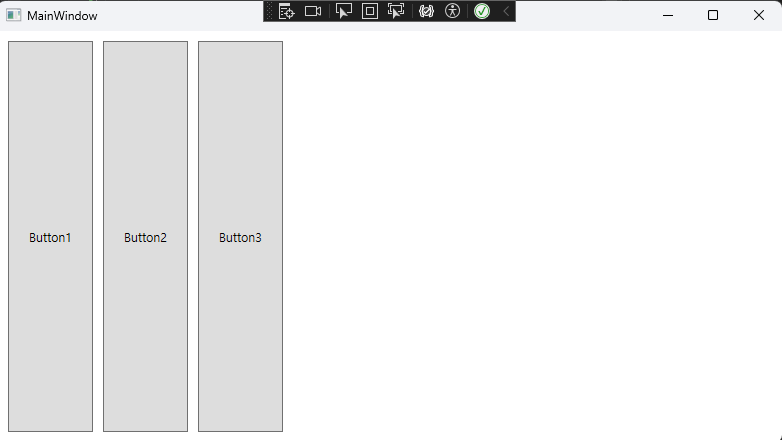
Orientation(자식 요소를 가로 세로 정하기)를 Vertical(가로)로 하면
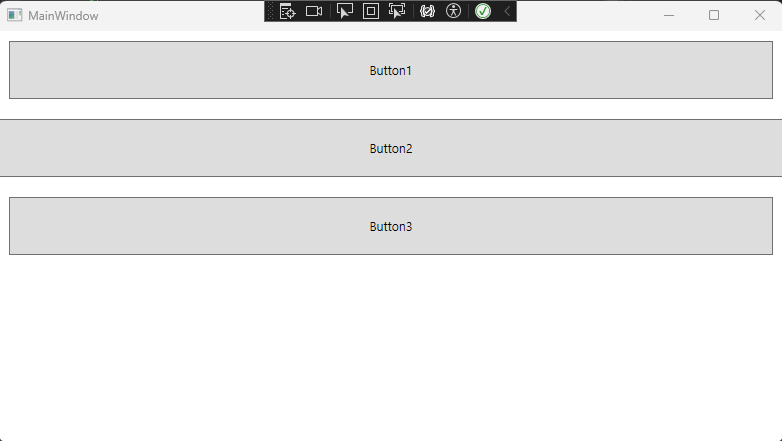
Horizontal(세로)
Login
<Window x:Class="_028_Login.MainWindow"
        xmlns="http://schemas.microsoft.com/winfx/2006/xaml/presentation"
        xmlns:x="http://schemas.microsoft.com/winfx/2006/xaml"
        xmlns:d="http://schemas.microsoft.com/expression/blend/2008"
        xmlns:mc="http://schemas.openxmlformats.org/markup-compatibility/2006"
        xmlns:local="clr-namespace:_028_Login"
        mc:Ignorable="d"
        Title="MainWindow" Height="450" Width="400">
    <Grid
        Background="LightSteelBlue">
        <StackPanel
            Margin="40"
            Background="AliceBlue">
            <TextBlock
                Padding="10"
                HorizontalAlignment="Center"
                FontSize="18"
                FontWeight="Bold">
                로그인
            </TextBlock>
            <StackPanel
                Orientation="Horizontal">
                <TextBlock
                    Width="90"
                    Margin="10 20 20 10"
                    HorizontalAlignment="Left"
                    FontSize="18">
                    ID :
                </TextBlock>
                <TextBox x:Name="txt_ID"
                    Width="160"
                    Margin="0 20 20 10"
                    HorizontalAlignment="Right"
                    FontSize=" 18">
                </TextBox>
            </StackPanel>
            <StackPanel
                Orientation="Horizontal">
                <TextBlock
                    Width="90"
                    Margin="10 20 20 10"
                    HorizontalAlignment="Left"
                    FontSize="18">
                    PassWord :
                </TextBlock>
                <PasswordBox x:Name="txt_PW"
                    Width="160"
                    Margin="0 20 20 10"
                    FontSize=" 18">
                </PasswordBox>
            </StackPanel>
            <StackPanel>
                <Button
                    Click="Button_Click"
                    HorizontalAlignment="Right"
                    FontSize="18"
                    Margin="10 20 24 10"
                    Width="160">
                    Login
                </Button>
            </StackPanel>
        </StackPanel>
    </Grid>
</Window>
레이아웃 설정
스택패널
그리드에 스택 패널 구성후 여러 컨트롤 구성
Button 클릭시 이벤트 설정 Click= "정의할 이름"
PasswordBox는 textbox안의 구성요소가 ****로 표시됨
using System.Windows;

namespace _028_Login{
    public partial class MainWindow : Window{
        public MainWindow(){
            InitializeComponent();
        }
        private void Button_Click(object sender, RoutedEventArgs e){
            if(txt_ID.Text == "abcd" && txt_PW.Password=="1234"){
                MessageBox.Show("Login 성공");
            }
            else{
                MessageBox.Show("Login 실패");
            }
        }
    }
}
버튼 클릭시 ID && PW가 정해진 값을 맞추면
메세지 박스 "Login 성공" 실패하면 "Login 실패" 라고 뜸

선호하는 프로그래밍 언어
<Window x:Class="_029_Language.MainWindow"
        xmlns="http://schemas.microsoft.com/winfx/2006/xaml/presentation"
        xmlns:x="http://schemas.microsoft.com/winfx/2006/xaml"
        xmlns:d="http://schemas.microsoft.com/expression/blend/2008"
        xmlns:mc="http://schemas.openxmlformats.org/markup-compatibility/2006"
        xmlns:local="clr-namespace:_029_Language"
        mc:Ignorable="d"
        Title="좋아하는 프로그래밍 언어" Height="400" Width="350">
    <StackPanel
        Margin="20">
        <TextBlock
            HorizontalAlignment="Center"
            FontSize="15">
            ■좋아하는 프로그래밍 언어를 선택하세요.
        </TextBlock>
        <Separator
            Background="LightSteelBlue"
            Margin="10">
        </Separator>
        <CheckBox x:Name="cb_C"
        Margin="25 5 0 5">
        C
        </CheckBox>
        <CheckBox x:Name="cb_Cpp"
            Margin="25 5 0 5">
        C++
        </CheckBox>
        <CheckBox x:Name="cb_CS"
            Margin="25 5 0 5">
        C#
        </CheckBox>
        <CheckBox x:Name="cb_P"
            Margin="25 5 0 5">
        Python
        </CheckBox>
        <CheckBox x:Name="cb_J"
            Margin="25 5 0 5">
        Java
        </CheckBox>
        <Separator
            Background="LightSteelBlue"
            Margin="5">
        </Separator>
        <StackPanel
            Orientation="Horizontal"
            HorizontalAlignment="Center">
            <Button Click="btn_Vote"
                Margin="10"
                Width="70"
                Padding="5">
                투표하기
            </Button>
            <Button Click="btn_End"
                Margin="10"
                Width="75">
                끝내기
            </Button>
        </StackPanel>
    </StackPanel>
</Window>
using System.Windows;
using System.Windows.Controls;

namespace _029_Language
{
    public partial class MainWindow : Window{
        public MainWindow(){
            InitializeComponent();
        }
        private void btn_Vote(object sender, RoutedEventArgs e){
            string result = " ";
            CheckBox[] c = {cb_C, cb_Cpp, cb_CS, cb_P, cb_J };
            foreach (var item in c){
                if (item.IsChecked == true){
                    result += item.Content + " ";
                }
            }
            MessageBox.Show(result,"선호하는 언어");
        }
        private void btn_End(object sender, RoutedEventArgs e){
            this.Close();
        }
    }
}
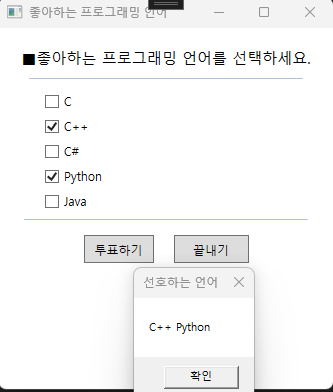
문자열 result 선언 후
CheckBox[] c = 배열 선언
item이 선택되었다면 result 값에 추가
MessageBox에 reselt 선언
User Controll
<Window x:Class="_030_UserControl.MainWindow"
        xmlns="http://schemas.microsoft.com/winfx/2006/xaml/presentation"
        xmlns:x="http://schemas.microsoft.com/winfx/2006/xaml"
        xmlns:d="http://schemas.microsoft.com/expression/blend/2008"
        xmlns:mc="http://schemas.openxmlformats.org/markup-compatibility/2006"
        xmlns:local="clr-namespace:_030_UserControl"
        mc:Ignorable="d"
        Title="MainWindow" Height="450" Width="400">
    <DockPanel>
        <TextBlock
            HorizontalAlignment="Center"
            FontSize="20"
            FontWeight="Bold"
            Margin="20"
            DockPanel.Dock="Top">
            Color Test
        </TextBlock>
        <StackPanel
            HorizontalAlignment="Center"
            Orientation="Horizontal"
            DockPanel.Dock="Top">
            <Button
                Width="50"
                Height="50"
                Margin="20">
                <StackPanel>
                    <Rectangle
                        Fill="Red"
                        Width="25"
                        Height="25">
                    </Rectangle>
                    <TextBlock
                        HorizontalAlignment="Center">
                        Red
                    </TextBlock>
                </StackPanel>
            </Button>
            <Button
                Width="50"
                Height="50"
                Margin="20">
                <StackPanel>
                    <Rectangle
                        Fill="Green"
                        Width="25"
                        Height="25">
                    </Rectangle>
                    <TextBlock
                        HorizontalAlignment="Center">
                        Green
                    </TextBlock>
                </StackPanel>
            </Button>
            <Button
                Width="50"
                Height="50"
                Margin="20">
                <StackPanel>
                    <Rectangle
                        Fill="Blue"
                        Width="25"
                        Height="25">
                    </Rectangle>
                    <TextBlock
                        HorizontalAlignment="Center">
                        Blue
                    </TextBlock>
                </StackPanel>
            </Button>
        </StackPanel>
        <Button
            Background="AliceBlue"
            DockPanel.Dock="Bottom">
            <WrapPanel>
                <TextBox
                    Foreground="Blue"
                    FontSize="30">
                    Multi
                </TextBox>
                <TextBox
                    Foreground="Red"
                    FontSize="30">
                    Color
                </TextBox>
                <TextBox
                    Foreground="Black"
                    FontSize="30">
                    Button
                </TextBox>
            </WrapPanel>
        </Button>
    </DockPanel>
</Window>
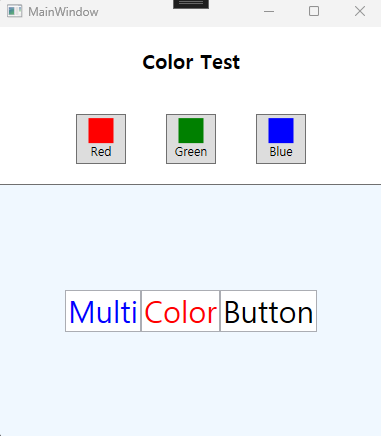
DockPanel 사용
Dockpanel.Dock = (값) 사용하면 상하좌우를 꽉채울수가 있다
UniformGrid
<Window x:Class="_031_UniformGrid.MainWindow"
        xmlns="http://schemas.microsoft.com/winfx/2006/xaml/presentation"
        xmlns:x="http://schemas.microsoft.com/winfx/2006/xaml"
        xmlns:d="http://schemas.microsoft.com/expression/blend/2008"
        xmlns:mc="http://schemas.openxmlformats.org/markup-compatibility/2006"
        xmlns:local="clr-namespace:_031_UniformGrid"
        mc:Ignorable="d"
        Title="MainWindow" Height="400" Width="400">
    <UniformGrid>
        <Rectangle
            Fill="Black">
        </Rectangle>
        <Rectangle
            Fill="Red">
        </Rectangle>
        <Rectangle
            Fill="Red">
        </Rectangle>
        <Rectangle
            Fill="Black">
        </Rectangle>
    </UniformGrid>
</Window>
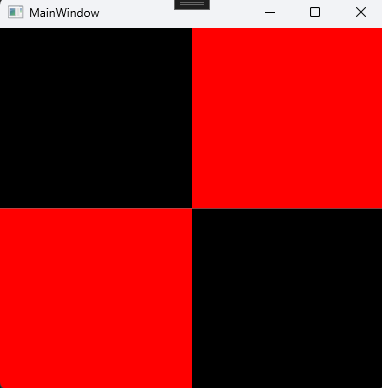
Uniform Grid를 사용하면 위에서부터 순서대로 채워짐
'C#' 카테고리의 다른 글
| 14주차-ELS (0) | 2024.06.07 |
|---|---|
| 13주차- SnakeBite (0) | 2024.06.02 |
| 10주차-Arduino Sensor Monitoring (5) | 2024.05.11 |
| 9주차-FireBase 완성 (0) | 2024.05.05 |
| 8주차-아날로그 시계(2) / FireBase(1) (0) | 2024.04.23 |


